In this post I will show you an Arduino Sketch I made for easily sending HTTP commands using ESP8266 NodeMCU board to control the digital output pins on/off so you can consume it on your browser thru a Web Interface, Postman or on your own app.
Using WifiManager makes it easy to change the home wifi settings on the ESP8266 without the need to hardcode these values.
Also WifiManager supports custom values, so we are going to take advantage of that to define custom mDNS host names, so instead of accessing the board thru the IP, we can access to a host name we define in WifiManager Access Point settings.
Thru mDNS we don’t need a DNS server to communicate to our local IOT devices.
The Solution
Just to clarify, I’m going to focus on the important parts of the code, the most common codes, if you have any doubt leave a comment and I will be happy to answer.
Setting up PINs
In order to sending HTTP Commands we need to specify which pins we are going to use on our board and how many.
First of all let’s start by creating a two variables and setting their values:
The TOTAL_PINS defines how many digital pins we are going to handle. In this case we are using 2 digital pins.
The PINS_INFO array defines which are these pins. in this case we are defining values for two index: 0 and 1, as above:
| Index | Value (GPIO) |
| 0 | 5 |
| 1 | 4 |
On the index 0 we are setting 5 which tells the Arduino that we want to use GPIO05, and on the Index 1 we set 4 which tells Arduino that we want to use GPIO04.
According to the ESP8266 NodeMcu pinout, the GPIO05 corresponds to the D1 pin, and GPIO04 corresponds to D2 pin.
After that we have the initializePins method, which as the name implies, it initializes the output pins and set them to Off by iterating the two variables we set above:
Note that the initializePins method has to be called only once in the setup() method of your sketch.
Reading hostname value
In order to access the board through wifi by using a friendly name we need a DNS hostname.
Usually, we hardcode a hostname on the Sketch and that hostname cannot be changed, making it difficult, for instance, to use in a smart home system where we may have dozens of ESP8266 devices using same Sketch.
By using WifiManager custom values we don’t need to hardcode the DNS’s hostname, so in order to do that, we need to attempt to read the “config.json” file that was previously written by WifiManager when we enter in Access Point mode to set it’s settings.
In order to do that, in the setup() method we must call the readHostnameValue() method.
This method works by attempting to read a pre-existing file on the device’s flash memory. If the file is found, it attempt to populate the domainName variable with the corresponding json value.
Note: This file is the file that WifiManager uses to store custom values.
Setting up WifiManager
in the setup() method we call initializeWifiManager() to initialize WifiManager and read the custom hostName value.
In this case we are creating a Wifi AccessPoint called “TheNextLoop_AP” with password “123456789”.
If is the first time you upload the Sketch, after connecting to the Access Point, navigate to IP 192.168.4.1 to edit/change wifi Settings, including hostname.
As soon as you connect to the access point TheNextLoop_AP using the password “12345678” to setup your Router’s user/password, define the device’s hostname and hit save, wifi manager will leave the Access Point mode and enter in the Station mode.
Note: After you hit “Save” in the Access Point the WifiManager will leave the access point mode and will try to connect to your router’s wifi network by entering in the Station mode. If you need to edit/change the WifiManager Settings later, use http://[your-esp8266-hostname].local/reset and push the “Reset” button on your ESP8266 board to connect again to the Access Point. Where “[your-esp8266-hostname]” is the hostname you defined in the WifiManager Web settings.
In the Station mode your ESP8266 will connect to your local network through your Wifi Router using the provided username/password, and will be accessible from the hostname you set.
Thru the hostname, you can access your device like this:
http://[your-esp8266-hostname].local/
where “[your-esp8266-hostname]” is the hostname you defined in the WifiManager Web settings.
Sending PINs Commands
When a PIN’s energy is “HIGH” we say it is “on“, when it is “LOW” we say that the PIN is “off“.
There is two ways to set a PIN to HIGH or LOW in this Sketch, either by using the Web Interface, or by directly sending GET commands on a browser, Postman-like apps or on your own apps.
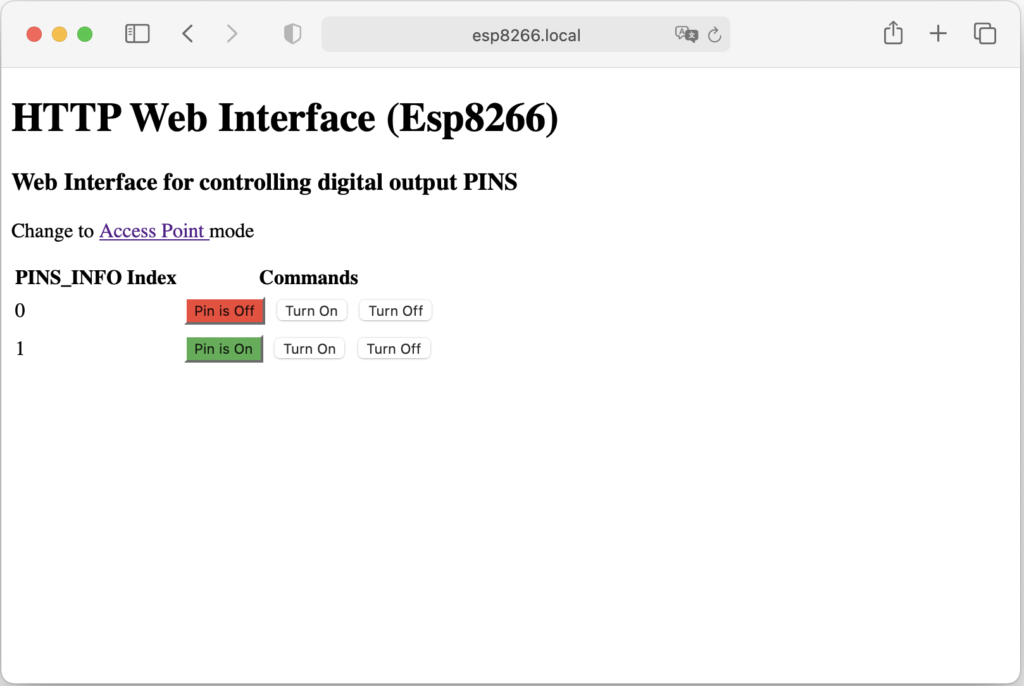
Using Web Interface
Depending on how you configure the The Setting Up PINs variables the web interface will render buttons to turn each PIN on/off.
Using Postman apps
Use Postman-like apps for sending HTTP GET commands like below:
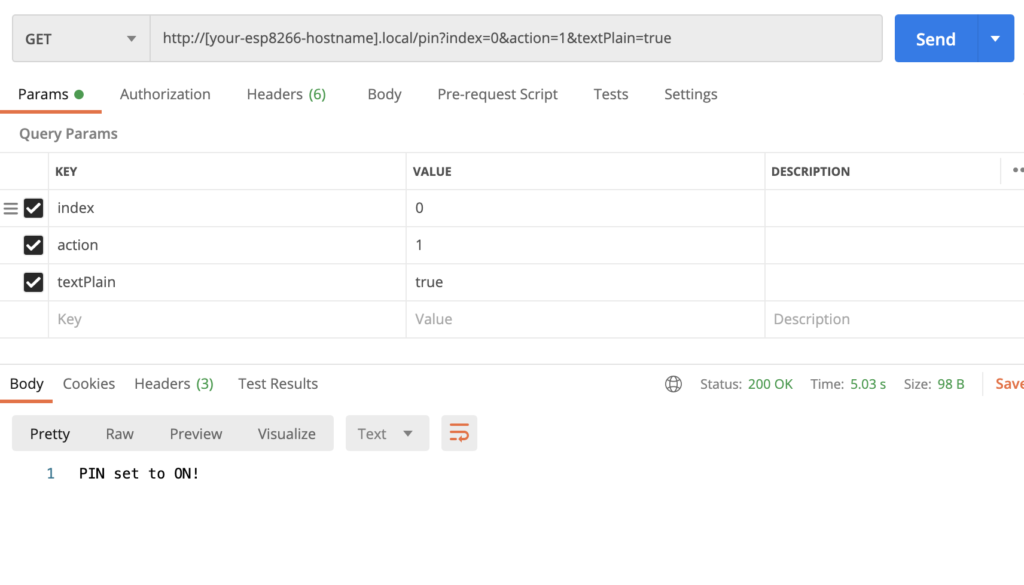
“http://[your-esp8266-hostname].local/pin?index=XX&action=YY&textPlain=true”
Where:
| [your-esp8266-hostname] | is the hostname your define for your ESP8266 board |
| XX | The zero-based index of the PINS_INFO array. |
| YY | The action to execute, set 0 to turn the PIN off, or 1 to turn the PIN on |
| textPlain=true | If True, it returns the response in plainText, so you use the response to read/parse on your smart home apps. |
[your-esp8266-hostname] is the hostname your define for your ESP8266 board in the WIfiManager when in Access Point mode
Thats all folks, thanks for reading!
You can get the full source code here.