Most of the time we deal with back-end service on our mobile (client) apps for consuming Microservices such as ASP .NET Core Web APIs.
Calling these resources without authentication is fairly easy, as you don’t have to worry neither with Bearer-Tokens (JWT), nor Refresh-Tokens, all you need is to make a simple httpclient request, for instance:
In the above code, we are just making an HttpClient request to a WebAPI and reading back the data. Note that we are not authentication by passing any JWT (Bearer Token) nor handling token expirations and http request retries.
Handling Bearer Token Renewals using Refresh Tokens
For security reasons, a Bearer Token aka JWT (JSON Web Token) does not last forever and when they expires we must obtain a new one for being able to communicate with the back end services.
There are two ways for doing this:
- Forcing your user to re authenticate / sign-in again, or
- Use your existing Refresh Token to retrieve a new Bearer Token + Refresh Token pair.
As the first option is annoying to the user, we will be covering the second one on this post today.
A typical workflow for consuming WebApi while dealing with Bearer-Token (JWT) / Refresh Tokens renewals during calls look similar to this:
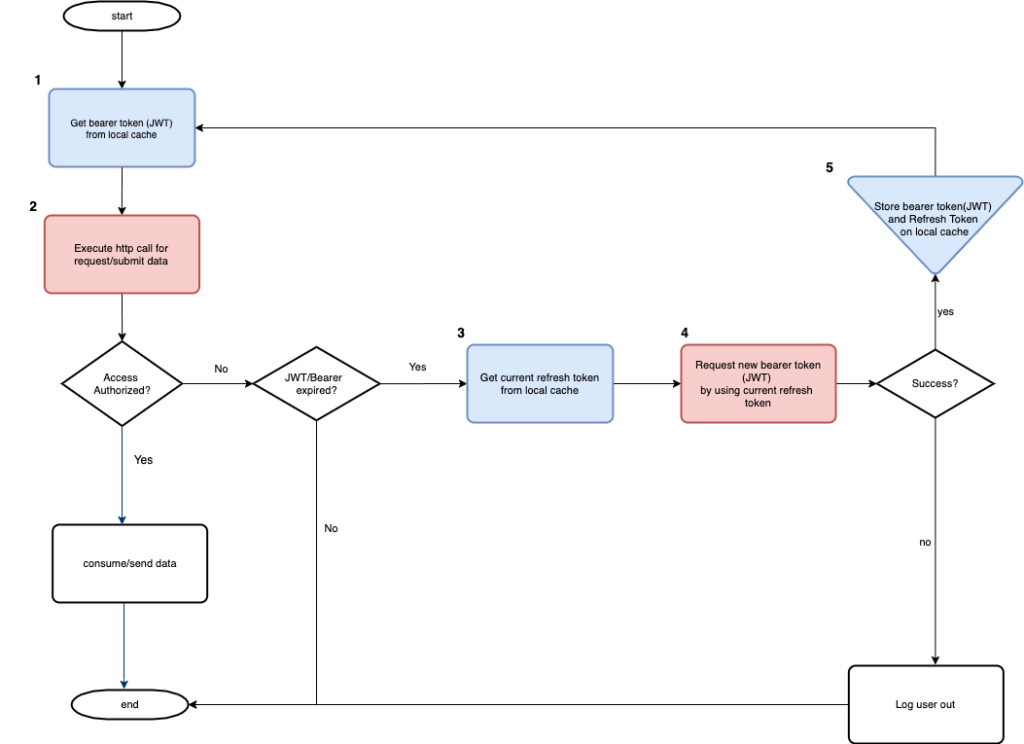
The workflow above works perfectly for single async-tasks calls.
If you raise multiple async-task calls at the same time and your Bearer-Token expires during these calls, all of your calls would try to independently renew the token by using the Refresh-Token they have, and they will all fail.
In this scenario, you have to implement some kind of semaphore to allow only the very first async-task to perform the tokens’s renewals while the other async-tasks awaits to the renewal to finish.
The solution
I’ve created a Xamarin.Forms service class called RESTService that is responsible for handling WebAPIs calls, these class can be found in the Xamarin Forms project in the sample code available on my Github.
The main purpose of this class is:
- Authenticate on your back-end service;
- Execute any HttpClient call (GET/POST/PUT/DELETE) you write to consume your WebAPI’s;
- Gracefully handle JWT Expirations;
- Transparently force renewal of Access Token / JWT / Bearer Token;
- Synchronize the execution of multiple async-tasks when renewing tokens;
- Resume your WebAPI call right after a token renewal;
Sample code for Xamarin
On my Github you can download the whole sample/working solution in C# which contains is composed by a Xamarin.Forms projects and a Back-End project in ASP.Net Core.
The screenshots below were got from the sample project.


Back-End’s Project Assumptions
- I will not go deeper on details of the back-end project as it only exists for the sake of demonstration.
- This back-end project is basically an ASPNET Core 3.1 project which uses In-memory Entity Framework Core, supports JWT/Refresh token and contains two WebApis, one for authentication/Refresh token, and other for demonstration of data being retrieved.
- For the sake of brevity I only implemented username/password authentication. If you use social authentication, I think the provided code is a good start point to implement on your own.
- For testing purposes I’ve configured the Bearer Token (JWT) to expires every 15 seconds, the Refresh-Token expires every 12 months. feel free to change it on the back-end project.
- I’ve hardcoded a user in the Startup.cs of the back-end project, so you must use Username = “test” and Password = “test” for testing purposes.
Using the code
As I told above the class RESTService class is available on the sample code, inside the folder “Services” in the Xamarin.Forms shared project.
Authenticating
You must first be authenticated before using RESTService.ExecuteWithRetryAsync(), so let’s start by authenticating thru AuthWithCredentialsAsync() method:
On a successful authentication, the Bearer-Token (JWT) and the refresh-token received are stored on local cache, and also accessible thru RESTService.BearerToken and RESTService.RefreshToken, so that they can be used later.
Calling your WebAPI
The RESTService.ExecuteWithRetryAsync() takes a lambda method that should be your own httpclient request to the WebAPI controller you want retrieve/submit data.
A couple of notes:
- The current RESTService.BearerToken should be provided in the Header (line 5) of your own httpclient request.
- You should always use EnsureSuccessStatusCode() method (line 9) so that in case of an expired Bearer-Tokens (JWT), an HttpRequestException is thrown and internally handled to start the renewal of tokens by using RefreshToken.
Thanks it.
Hope you enjoy!
Hi Ana, I like this post a lot, but I have a few questions:
in your PeopleService you are using a “using block” like this:
using (var client = new HttpClient()) { … }.
is not this a bad practice with HttpClient creating new objects?
Can we reuse the HttClient created in RESTService?
Regards,
Hi Reynaldo,
You are totally right, in a real application we could reuse the http client, or even better split it into a separate class, by following the separation of concerns principal.
Sorry for posting it as I did, but I focused on showing the idea of the token refresh behind the code.